

|
|
100%
by Paul Lukacs, with Ted Muller
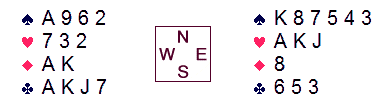
South leads the ♠Q.
East to make 6♠ against any defense and distribution.
When first published, this problem was touted as being only 99.9% secure, which means that the author missed the hand's best feature (in failing to appreciate that the diamond situation was immaterial). A truly elegant layout, this is a composer's dream in that there must be no variation in the sequence of plays.
Declarer wins the ♠A; in order for there to be any problem,
trumps must split 3-0. Assuming that to be the case, the
♦A is led. If that is not ruffed, a spade is played to the
king, then a club toward dummy. If south is void, he cannot afford to ruff a
loser. The ♣K wins, and a heart is played to the ace.
If that is ruffed, then the club loser goes away on the ♦K and a
marked heart finesse is taken.
If the ♥A wins, another club is led toward the ace. Now a club
is discarded on the ♦K. If that is not ruffed, south is
thrown in with a spade, and he is endplayed. Declarer covers a lesser club lead,
or gets a free heart finesse.
If, at trick two, south does ruff the first diamond and returns a black suit,
declarer wins the ♠K and ♣K, then plays
off two high hearts. If north shows out on the first heart, then his pattern must be
0-0-10-3; after discarding a club on the other diamond, a club ruff will set up a
trick for a heart discard. Alternatively, if north shows out on the second heart,
then he is 0-1-10-2; the trumps are drawn, squeezing south in clubs and hearts.
Finally, if north follows to two heart leads, then he can have only one club, and a
second-round finesse in that suit is marked.
