

|
|
Clearing the Way
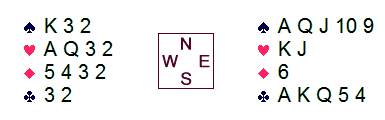
Contract: 6♠ by East
Opening lead: ♦K
North, who is not an idiot, overtakes his partner's opening lead with the
diamond ace, then returns a trump, upon which south discards a diamond.
If clubs are 3-3, they will run; if they split 4-2, then ruffing one high
would set up the suit. If north has the long hearts, then four of those could be
cashed by using the ♠K as an entry. Alternatively,
if south has the long clubs, he could be squeezed by running the spades, then cashing
three hearts. Should south hold the long hearts, then drawing trumps and cashing
three clubs would squeeze him in the red suits. One of these plays is guaranteed
to work, but which one? North could possibly ruff an early round of hearts
or clubs.
If fact, you don't have to guess anything. North has five spades and
one diamond. Even if he holds all the missing clubs, he still would have
to follow suit to one round of hearts. So it is safe to cash the
♥K. Do that. If south shows out, then you can arrange
to cash four heart tricks prior to drawing the trumps.
Let's say the south follows to the heart lead. That means that north
cannot hold more than six of that suit, in which case it is safe to cash the
♣A! Do that. If south shows out, then ruff one club,
draw trumps, and later discard a club on a heart winner.
Let's say that south follows to the first club lead. Now it is safe to cash a second heart! If south shows out, then arrange to win four heart tricks as before. Similarly, if south follows to the second heart, then it is safe to cash a second club. If south shows out on the second round, then cash the other high club and ruff two clubs in dummy.
If south follows to the second club, then one club ruff with the
♠K will set up that suit.
Do it when it counts!
