

|
|
Moysian Madness
by Ted Muller
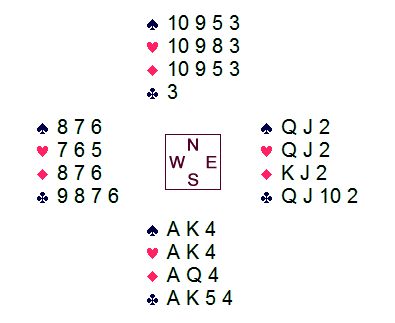
South to make 6♠
Opening Lead: ♣9
I discovered this tricky layout while developing a computer program. A number of pitfalls are available to both the offense and the defense.
Declarer wins the opening club lead with the ace as east plays the ten-spot,
then cashes the ♠A-K. If east keeps a high trump,
then the ♣K is cashed, discarding a small red card.
A club is ruffed and the ♥10 is led, covered by east
(although it doesn't matter). South's king wins, the last club is ruffed,
and hearts are finessed again. If east ducks, dummy wins and leads the
♦10, jack, queen. If instead east covers the second heart,
declarer wins, plays a third heart to dummy, then leads the ♦10.
In hand with the ♦Q, south cashes any heart honor he may still hold, then throws east in with a trump lead for an endplay in diamonds. What fun!
Now let's go back. Suppose east discards his trump honors on the first
two leads! That changes everything. Declarer cashes the
♣A, discarding dummy's ♥3. East's
best play is to unblock a club honor, in which case declarer must now lead the
♦Q! East grabs the king and can do no better than to return
a club.
Dummy ruffs and advances the ♦10. If that is ducked, then the
♥10 is led, covered and won by south. Declarer cashes the
♦A and draws the trumps with dummy's
♠10. The long diamond and another heart finesse brings
declarer to twelve tricks. Alternatively, if the ♦10
is covered, south wins and plays either a diamond or a spade to dummy for the first
heart finesse.
Traps:
Assuming that east unblocks the first club:
If declarer errantly discards a diamond at trick two:
