
 |
 |
Movie #1 : page 3

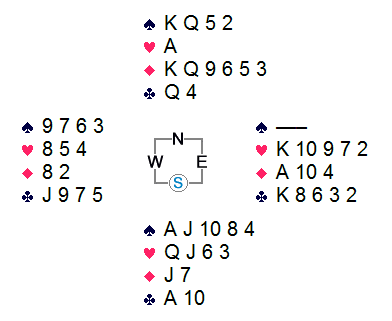
East has two meaningful options: one is a diamond lead, which would kill a potential diamond winner and weaken declarer's trumps; the other is a king-sacrifice gambit. Leading the heart king would kill the diamond suit altogether, but it would set up the queen and jack of hearts.
If declarer is 5-5-2-1, then a diamond return guarantees
defeat the contract irrespective of the spade spots.
Declarer's major-suit tricks would now be limited to six trumps and
three hearts (by drawing trumps), or seven trumps and two hearts
(crossruff). In any case, declarer does not have that
hand! That would give partner
 J 10 9 x x,
and surely he would have led that suit rather than a
top-of-nothing heart.
So the layout must be the one shown above, and a diamond return is no good. Declarer could ruff high and draw all the trumps, ending in dummy. Now the run of the diamonds would squeeze your hand in hearts and clubs.
The defensive counter is to lead the  K,
ruffed in dummy. Now, unless declarer owns the
 9, he cannot avoid losing a trump
trick. Being forced to ruff the club ten with a trump honor,
another diamond lead from dummy will uppercut declarer's trump
holding and seal his doom.
Declarer immediately acknowledged that he could have made this hand by not blocking the spade suit. Had the first trump lead been won in dummy, the uppercut would not have materialized.
NOTE: This hand exemplifies Ted's Law #1:
It's not what they could, it's not what they should, but it is what they do.