

 |
 |
MAKE A SHORT SUIT LOOK LONG
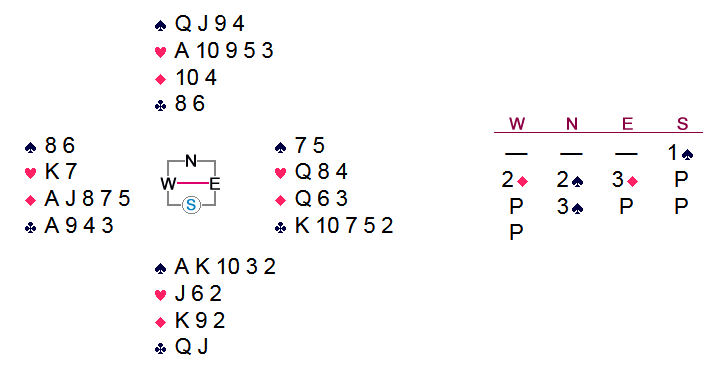
The opening lead of a trump is won by dummy's queen
. Declarer
promptly plays a club to the jack
and ace
. Average Joe now
has a dilemma. If declarer has the other high clubs, he will be able to
discard at least one of dummy's diamonds; so A.J. panics and cashes the
ace
of diamonds, handing declarer his contract.
There is a clue to a winning defense. Assuming that east's play
of the two
of clubs shows an odd number of the suit, presumably three,
that would give declarer four; and with ♣KQJx
along with ♠AKxxx, he surely would have
bid 3♠ himself. A.J. goes wrong here either
because he has not attempted to count declarer's hand, or because he does
not trust partner to have the odd number of clubs that he ostensibly has shown.
MAKE A SHORT SUIT LOOK LONG
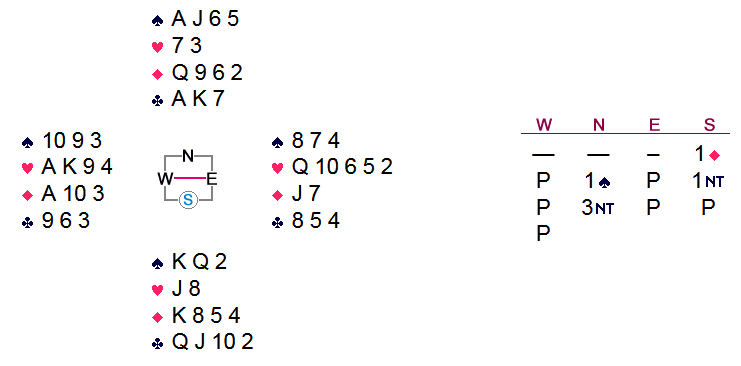
This hand is from a Swiss Teams at the local sectional. Whatever
possessed south to open the bidding is unknown; but that's another issue.
When dummy goes down after a spade lead, he can see eight easy winners and
will need a club trick as well. Feeling that he might improve his
chances, declarer grabs the ace
of spades, then leads a heart to the
jack
at trick two!
From west's perspective, that play is not unusual. Declarer could
have a four-card heart suit on the bidding, consistent with east's
play of the heart deuce
; so west leads another spade, still hoping to
promote something in partner's hand.
Winning the spade king
, declarer plays the club ten
to
the ace, furthering the illusion of shortness there, then leads a diamond to
the king
and ace
. This is west's last chance to unravel the
illusion and find the defense's tricks; but without much to go on he tries a
third spade, whereupon declarer claims his game.
Had declarer simply played on diamonds at trick two, west might or might not have found the switch. A greater concern was the east might win the diamond, in which case he surely would switch to hearts himself. This was a difficult situation for even good defenders to work out.
East's first play of the spade four
was consistent with a possible
holding of Q874; so west had no clue there. East had
other ways of showing partner that he did not have the spades, but Average
Jane doesn't know them. A better clue that something was amiss was
the fact that declarer elected to lead a club when ostensibly he needed
to develop both of the red suits, but poor west understandably was
unprepared to process all that input in the heat of battle.
MAKE A LONG SUIT LOOK SHORT
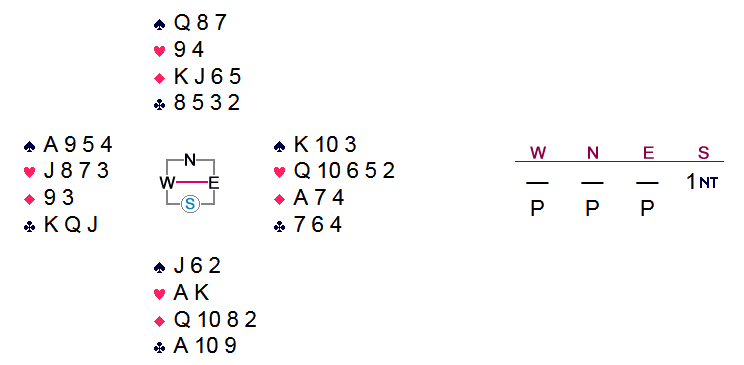
South's Weak Notrump opening bid effectively shut the opponents out of the bidding, as it so often does.
The club king is led. When dummy appears, declarer can see that
the opponents are ice-cold for at least eight tricks in hearts;
but he would like to go plus anyway if he can. To that end, he
eschews his guaranteed second stopper by following with the club
ten
! West, 'seeing' 9xxx in partner's
hand, continues clubs; but now it is too late to defeat the contract.
Declarer takes the ace
and plays a third club, establishing the
eight-spot
Had declarer won the opening lead and later played on clubs himself, the defense would have had time to find the heart suit and defeat the contract with a trick to spare.
MAKE A LONG SUIT LOOK SHORT
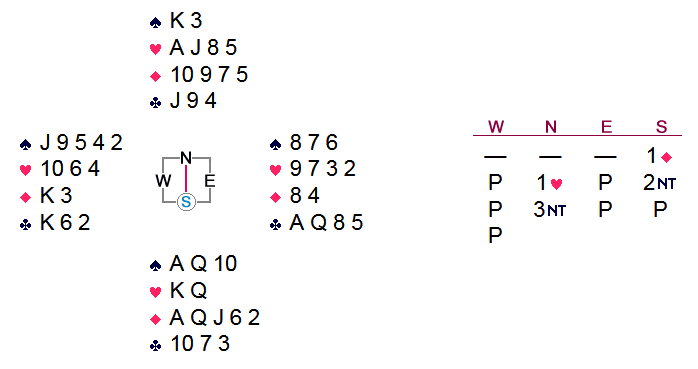
On the opening lead of a low spade, declarer plays the king
and
underplays the queen
! A diamond finesse runs to west, who wins
the king
and... does what? Well, Average Joe will return a spade
almost every time, irrespective of partner's plays. Making five.
The queen-gambit would have given up an overtrick had the diamond king
been onside. Was it worth it? You bet! One should make
the same play even without the spade ten
.
SECOND-HAND HIGH
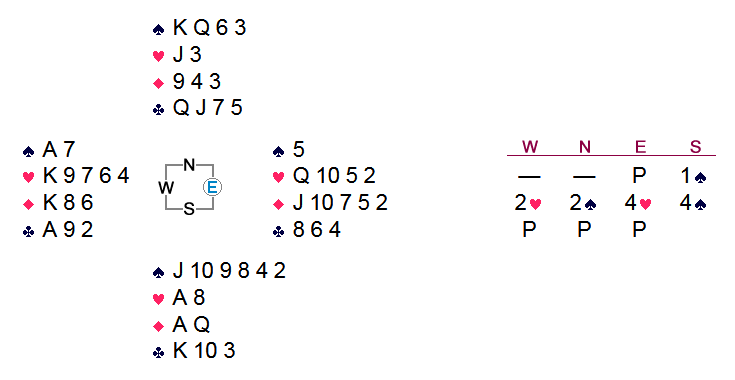
The opening lead of a heart goes to the jack
, queen
and
ace
. West grabs the first trump lead, and... what? As it
happens, the only winning defense is to lead another heart to partner's
ten
and get a diamond return, thereby setting up a trick in each suit
for the defenders. If partner doesn't have the heart ten
, though,
such a lead would hand declarer an overtrick.
It would not help to duck the first spade, hoping to get a signal on the next
one; declarer simply would switch to clubs, discarding the diamond queen
before west regains the lead. In a team game, west's course is
clear — try a low heart lead and go for a set; but at matchpoints,
giving up that overtrick would be disastrous.
Note what a devastating effect the simple play of second-hand high had!
Without it, east would routinely have inserted the ten
of hearts at trick
one, and west would have known that he could safely underlead his king
later.
PAINT A FALSE PICTURE
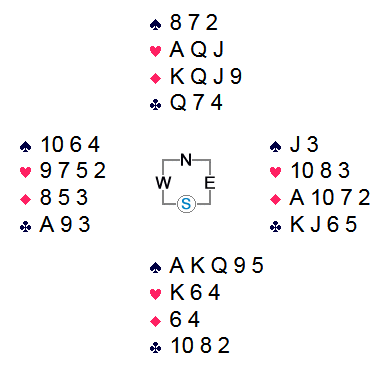
After opening the bidding with 1♠, south plays
in 4♠. The opening lead of a trump runs to
declarer's queen
. The next four plays are a heart to the jack
,
another trump, a heart to the queen
, and a third round of spades.
Now a diamond goes to the king
and ace
. What to do?
On this occasion, east is a reasonable player who bothers to count some
things. He knows about five spade winners, three hearts, and two
diamonds waiting. Since south opened the bidding, he must hold either
the club ace
or the heart king
. If it is the club, then a
club return here would hand declarer a twelfth trick; if it is the
heart king
, then why in blazes did declarer bother to play that suit so
soon, seemingly using the high trumps as entries for two heart finesses?
If east doesn't figure it out, he is going to lose 470 points.
One minor clue is that declarer actually could have drawn two rounds of trumps
before making the first heart play; but then he would have had to lead
diamonds from dummy instead of from his hand, so that isn't much help.
Another possibility would be to rely on partner to put up the heart king
on the second lead of the suit if he had it. Since east showed him a
three-card heart holding, that play could not cost, although it could
cause partner to miscount the overall distribution.
Is there another way? Yes, there is, and it's not even hard. In a skilled partnership, east already knows where the club ace is! How? Well, you will just have to read my page on Defense for the answer to that one.
None of this takes away from declarer's effort, however; for with a modicum of misdirection, he gave east a big problem. Oddly enough, Average Joe probably would return a club almost without thinking, getting lucky in this case.
LEAD THE LAST TRUMP
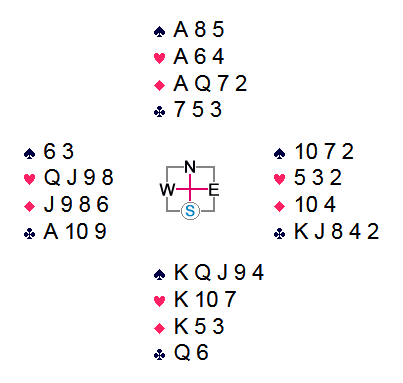
West leads the queen
of hearts against a contract of
4♠. Declarer wins dummy's ace
and
promptly plays a club to the queen
! Interestingly enough,
it already is too late to prevent an overtrick. Why?
Declarer could not see the entire deal; what he could see was that if
diamonds split, he still could win eleven tricks eventually even after
losing two clubs. He was catering to the possibility that diamonds were
not splitting 3-3.
Say that west exits with the ten
of clubs, not that it matters.
East overtakes with the king
and returns a heart, not that that matters
either. Winning the king
, declarer plays four rounds of spades,
to this position:
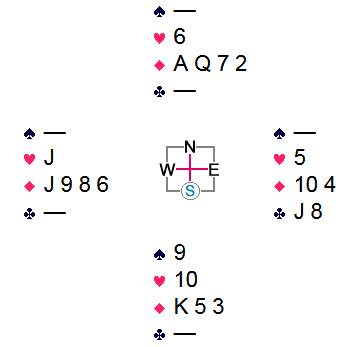
On the last trump lead, west is squeezed. Compelled to keep the
jack
of hearts, he must discard a diamond, allowing that suit to be
run. By giving up the two club tricks, declarer rectified the count;
those cards had to go away before the squeeze could function.
There were two points to the play here. Firstly, declarer recognized
the value of playing off the last trump, something that Average Jane cannot
seem to envision. Secondly, it was important to lead clubs early,
before east could know what was going on. The only way to have held
declarer to his contract was for east to have risen with the club king
on the first lead of the suit, to return a heart. That play would have
been easier after getting a signal from partner on the third round of trumps.
MANAGE YOUR ENTRIES SUBJECTIVELY
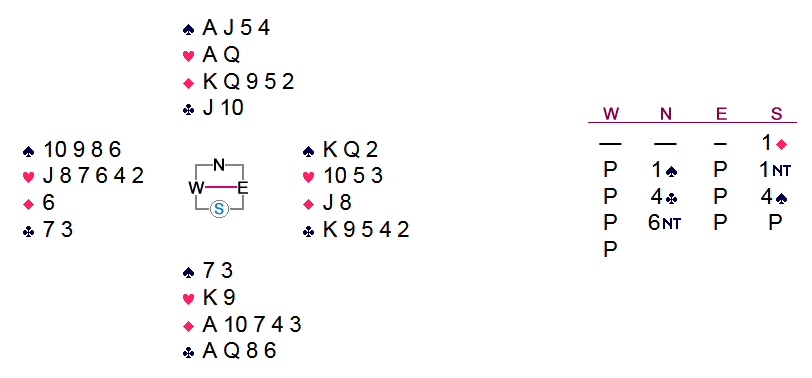
Your partner, conscious of your superior declarer skills, has checked for
aces, then opted for the maximum contract rather than a more prudent diamond
slam. The opening lead is the ten
of spades. Because you
can see only eleven tricks even with a successful club finesse, you properly
duck the first trick. After winning the next spade lead, you call for
a club, which is covered by the king
.
You are pleased that the club finesse worked, but you really didn't want
east to cover the ten
and block the suit. Had he played low,
you could have run off all the red cards and squeezed him in the black suits
if he started with four or more clubs originally. You continue with a club
to the jack
, cash the ace
and king
of hearts, then try the
ace
of clubs, hoping that the nine
will drop; but no.
There still is hope, however, against Average Joe. You cash the ace
of diamonds, lead the three
of diamonds to the king
, then the
queen
of diamonds, underplaying the ten
, to this position:
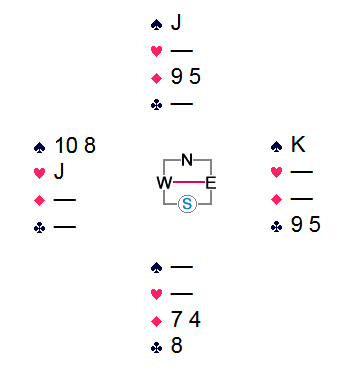
You call for the nine
of diamonds. East has an easy club discard
on this one, but what will he do when the five
of diamonds is led?
The answer is: It depends. Has A.J. counted the diamonds? Does he
know that you also started with five of them? If not, then he surely will
keep the king
of spades, assuming that dummy will win the last diamond.
If however, A.J. does know that you still have a diamond, which one is it?
That five-spot
The answer is: It depends. This is a most unusual situation in that
declarer must gauge how much A.J. actually knows. If, for example,
east cries, "No diamonds, partner?" on the second round of the suit, then it
is reasonable to infer that he does know that you have five of them; and
your best chance is to play the diamond seven
under the nine
.
If A.J. has not been paying close attention, he will not realize that dummy will
win the twelfth trick.
Conversely, if A.J. is behaving normally, meaning that he is not counting
well, then he surely will keep the high spade; if you judge that to be the
case, then save the diamond seven
for last. Be sure to make this
decision before leading the third round of the suit, though.
You must play in tempo on the fourth round so as not to give anything away.
I call this the Reese Coup, after a similar ploy suggested in one of
Terence's books. Holding 9753 in hand opposite
KQJ4 in dummy, the three honors are played off, whereupon an
opponent might not realize that dummy's four-spot
GIVE THE OPPONENTS A CHANCE TO GO WRONG
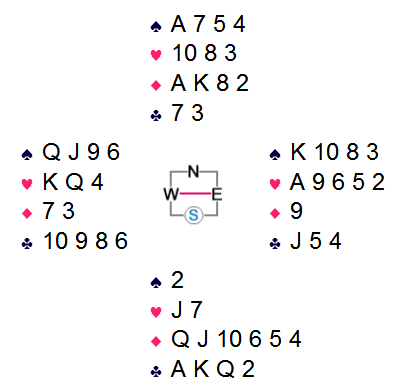
In a matchpoint game, South plays in 5♦ with no
bidding from the opponents. The opening lead of the ten
of
clubs is taken by the king
, and trumps are drawn in two rounds.
Now what?
Is this a joke? At this juncture you could simply place your hand upon the table and claim your contract, losing just the two heart tricks. That is the wrong tactic, however, because you haven't given the opponents a chance to make a useful mistake. The expert line is to play off a third round of trumps!
West does not have an easy discard, although paying attention to any
signal from partner might help. Pitching a spade could be fatal if
declarer started with more than one card in that suit, because that would
enable the establishment of dummy's fourth spade; similarly, a heart discard
would give up a trick if declarer held AJx there. Your
defender might well choose to discard a seemingly worthless club in this
situation; after all, if declarer had club losers, he would not be
squandering dummy's trumps. Right?
Wrong. Parting with a club proves disastrous, for now declarer can discard two of dummy's hearts on his winning clubs and rake in a precious overtrick.
This deal is a classic case of revealing as little as possible for as long as possible. Had declarer, for example, humored himself by ruffing a spade or two early, LHO would have known that a spade discard was safe. Also, declarer should try to guess who has the long club and arrange to lead through that hand on the third round of trumps, forcing him to play before partner has a chance to show him another card.
If you have no clue about the distribution, then declarer should at least
arrange to lead the third trump through the hand with the singleton
diamond, compelling him to discard before having seen any plain-suit
signal. That is accomplished by cashing the queen
first, then
leading the jack
and overtaking if LHO follows to the second round.
Note: The results of a local survey were
mind-boggling. I polled thirty of the best declarers in the
Sacramento area; yet only one player, Don Guerin, thought to make
this no-lose play — one that is so easy in retrospect,
but which needs to be thought of and implemented in real time.
In those other players' defenses, however, I believe that despite admonishments to the contrary, a couple of them might have felt compelled to look for something more exotic solely because I had bothered to pose the problem.

ADDENDUM
Some double-dummy aficionados (including my regular partner in
this case) might observe that a legitimate line for twelve tricks actually
is available by way of a dummy reversal and a squeeze on RHO under the right
conditions. If your contract is 6♦, then perhaps
that is the best approach; otherwise, since that ploy risks losing up to
three tricks, it's not worth it. In any case, such matters are beyond
the scope of these pages, because they have nothing to do with the handling
of Average Joe.