

|
|
Movie #9 : page 3
Where is the ♣A
? If partner has it,
then it is a simple matter to grab the ♥
and take a club trick later; it cannot get away. Yet, just as a diamond
signal could be disastrous from partner's perspective, a club discard at trick
three could be fatal in a layout where there is no heart loser:K
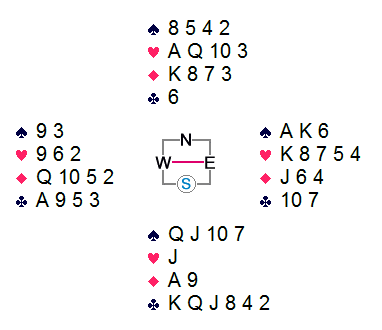
If west throws a club, the suit comes home with one ruff, and the
hand is over. However, partner does not have the
♣ for two reasons. One clue is
that declarer did not arrange to win the third trump in dummy so as to lead
clubs toward his A
,hand — an automatic procedure. A more reliable
indicator, however, is once again indicated by partner's carding in the heart
suit. Holding the ♣ she would have
played the A
,♥ then her 2
,second-lowest
( in 6
or 7
),suit-preference fashion.
Her actual heart plays were non-committal, indicating no preference.
Okay. Partner has no aces. But where are declarer's ten
tricks? If south's clubs are as good as
♣
and he guesses to finesse in the right direction, then nothing can be done.
Additionally, if his pattern is AQJ4-2-3-4, then he can discard a diamond
on dummy's hearts and ruff out that suit for another trick.
If declarer has a singleton diamond (4-2-1-6), then he probably
would have played on clubs, not needing to lose a heart. Also, partner
probably would have discarded her idle fifth diamond at trick three, having
nothing much else to say. So you assume declarer to be 4-2-2-5.
But you have yet to play to the heart lead at trick four, and your opponents are beginning to stir uncomfortably.