
 |
 |
How to Steal an Open Pairs
You find yourself in the Wednesday Open Pairs Championship, that being the choice after having performed poorly in the previous day's Knockout Teams. On the bright side, your partnership is now in control of its own destiny!
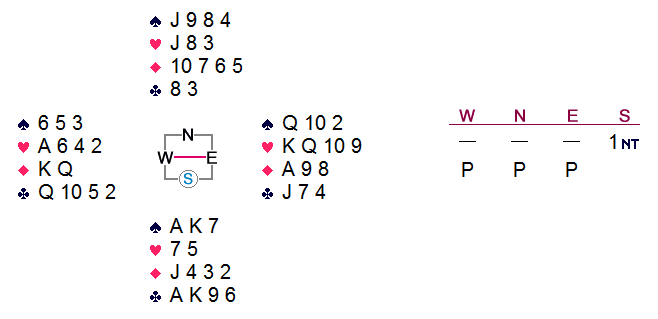
Board #2 in the afternoon session was more like taking candy from a baby than actual theft:

Opening lead: ♣2
Declarer really couldn't get anything going on this hand; when the smoke cleared,
all that he could win were his two ace-king combinations, for down three.
Yes, East-West can make 3NT against any defense; yet who would bid it, and why? In fact, no pair bid and made a game. Most of those who did get into the bidding ended up in a heart contract, taking eight tricks after losing two spades, two clubs, and a club ruff.
So what is the big deal about this hand? Answer: the north player
should not have passed 1NT. Had she responded
2♣ (Stayman), planning to pass any rebid from partner,
her side would have found a 2♦ contract, which could be
defeated by only one trick. After that sequence, I would have been compelled
to balanced with a takeout double, and partner would have declared in
2♥, scoring +110.
Ironically enough, our opponents were the pair that finished 2nd Overall in
this event, a mere two matchpoints behind us. Had north bid
2♣ on this deal, we would not have won the event.

In case you thing me a lunatic for suggesting a bid with the north
hand, I have news for you. My recent computer simulations of this very situation
show that responding 2♣ is a heavy favorite overall.
Watch for an upcoming related article on my Simulations page.

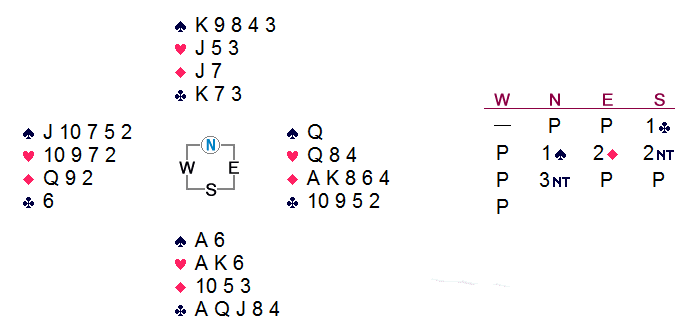
This brings us to our very last chance in the entire event, Board #14:

Opening lead: ♦2
South's rebid of 2NT logically shows about 18 high-card points,
which he had. It also showed a diamond stopper — that he did
not have. That possibility did not occur to the east player, however;
for she promptly cashed the king and ace of diamonds, blocking the suit.
After winning the third round of diamonds, west shifted to the
♥10, covered by the jack, queen, and ace. On the run of
the clubs, west was under some pressure and needed to consider the position.
A simple count of the points would essentially reveal south's exact holding.
Therefore, partner could not provide any help in spades. Partner might be able
to guard hearts, however, if she has the eight-spot. Although a heart
discard was the no-lose play in this situation, west elected to pitch a spade;
so partner won a tenth trick with dummy's ♠9, for
+430 and a virtual top on the board.
Despite west's errant discarding, it was east who blew the big score.
Both the bidding and the opening lead suggested that south and west started life
with three diamonds each. East should have won the ♦K
and returned a low diamond, in the expectation that partner had an entry.
This play would not necessarily defeat the contract, but it could not cost.
To verify that, try placing south with 18-19 high-card points including
the ♦Q and the known ♥AK; you will see
that there is no possible south hand that could produce twelve tricks without giving
up the lead first.

Had we not bid and made game on this final deal, we would not have won the event. Whether by divine intervention, analysis of tea leaves at the dinner break, or (most likely) blind luck, partner Joe produced a magical result at a critical time. Bless his little heart!