
 |
 |
The Diamonds Are Paste
Upon returning from the evening duplicate, you retire to your four-poster
with a shot of your favorite liqueur, preparing to study your handrecord
printout. (That is what you do, isn't it?) You happen to
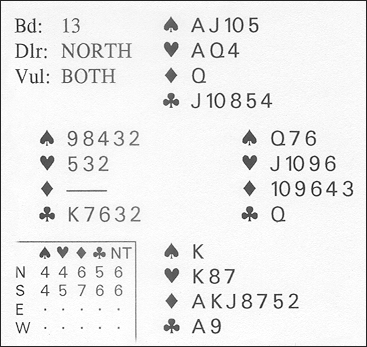
glance first at the back side of the sheet, and this board catches your eye:

If you and your partner happened to reach 7NT, then
take full marks for your bidding despite your zero on the board, because the
contract is easily made 96% of the time. Those who reached the
inferior NT were undeservedly lucky, as the opponents were
unable both to develop and cash a club trick. Most of the field, however,
played in 6♦, doubtlessly congratulating themselves for
their conservatism when the bad trump split was revealed.
But you are more concerned with The Way It Is
than The Way It Was, and the little analysis — compliments of
the marvelous program, DeepFinesse — shows that
south actually can take all the tricks in diamonds on a double-dummy
basis. Hmmm. Intrigued, you resolve to determine how that might be
accomplished. Study the problem if you like, before reading on.

Your first clue is in the analysis itself: it indicates that if
north is declarer, only twelve tricks can be won. Hmmm. Such a disparity
always means that one defender is able to make a more effective opening move,
such as leading though an unprotected king, obtaining a first-round ruff,
or the like. In this case, the only meaningful difference is the option of a
diamond lead by east, which is sufficient evidence that a trump lead would defeat
a contract of 7♦ Hmmm.
That slight clue suggests that it might not be in declarer's best interests
to play on trumps early, which is indeed the case. Being a serious student
of the game, you have studied books on play problems and card combinations
over your bridge lifetime, thereby markedly improving your skills. So it
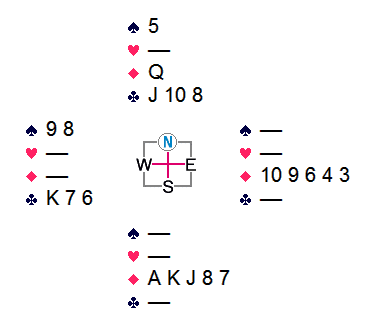
isn't too difficult for you to envision the requisite end-position
for avoiding a trump loser:

North leads a black card, and east is powerless to protect his position.
This exotic Trump Coup is not possible without a re-entry to dummy in
the trump suit itself, and that is why an opening diamond lead would scuttle
any chance of winning all the tricks.
Awareness of the necessary ending matrix also provides sufficient clues to
solving the entire problem. It is necessary for declarer to shorten his
trumps by ruffing two black cards, yet also to have dummy on lead after the
eighth trick. Therefore, three dummy entries are needed outside the trump
suit, and the only possibilities are the ♥AQ and the
♠A. Has the light dawned yet?
Let's try the play against, say, a heart lead. This trick must be taken in
the south hand. Now the ♠K is overtaken by dummy's
♠A, and the ♠J is led.
If east covers, declarer ruffs; otherwise he discards the ♣9,
then trumps a spade. Let's say that east covers the second spade.
South ruffs, crosses to the the heart queen and ... Oops! No good.
After cashing the ♠10, if dummy's last spade is led for
a ruff, east will dump his singleton club queen. So the
♣A must be played off before leading the second
heart. Now matters are in hand. Declarer ruffs a black card and plays
his remaining heart to dummy's ace, achieving the desired ending.
Is it correct to play the hand that way? Of course not — unless,
perhaps, east has foolishly doubled a bid of 7♦.
But now you have determined The Way It Is,
and that's the way you want it.