

 |
 |
ANSWERS — Cornucopia #2


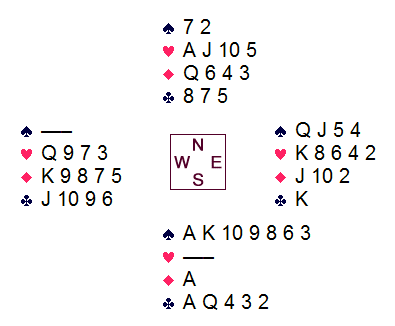
Against four spades, a major-suit lead would be fatal, as it would provide a
key entry for holding the trump losers to one. On a minor-suit lead,
declarer plays off the three aces in hand, then leads a low club.
West has several unattractive choices:


Not one pair bid to this virtually laydown grand slam. Sitting north,
I missed a call that cost us. After partner's 4♣
splinter bid, I simply leapt to 6♠. Had I not been
so hasty, however, a cuebid by me would have elicited 5♣
from partner, after which a follow-up of 7♠
would have been obvious.
Justice was not adequately served, however, because only three of
twenty-six pairs bid any slam at all! So our +1460 was worth
24 of 25 matchpoints.


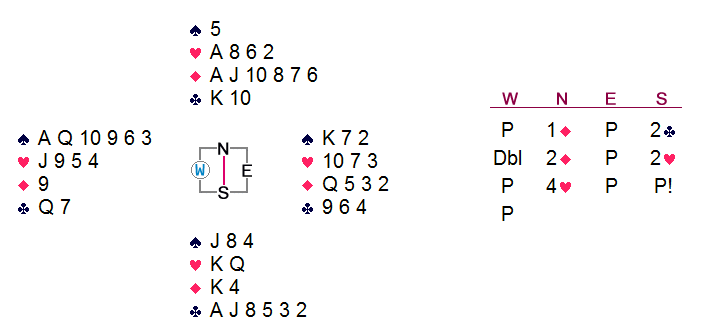
Worst Play: It's close between west's double
and his rotten opening lead. I give the nod to the takeout double; for had
he chosen to bid 2♠, partner could have raised, making the
killing spade lead easier to find. Even 3♥ could have
been defeated had the opponents led from their strength. This is a good
example of the Wrong Stuff Coup in action.


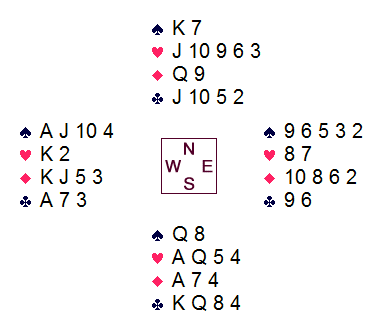
My partner, feeling that there was room in my hand for a queen, tried to find it with a diamond lead. Making four. Chip Martel led a low club. Down two, with the aid of a club ruff.
I agree completely with the champ's choice; my hand did not rate to have as
much as a queen, and as you can see, it wasn't needed anyway. Arguably,
the diamond would be a better lead against a lower-level contract.


Against 4♠, your LHO leads the king and ace of diamonds.
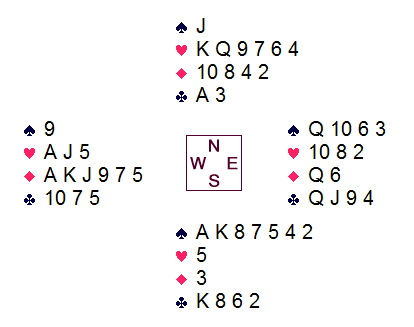
On a double-dummy basis, the only winning defense is for west to advance her singleton trump at trick two. By later ducking the first lead of hearts, you would be held to six spade tricks, one heart, and two clubs.
Having been given this reprieve, you ruff the diamond and lead a heart.
It really doesn't matter what west does, but at your table she grabs the
♥A and shifts to a club.
Winning the ♣A, a top heart is cashed; the crafty
opponents play the deuce and jack. One obvious line is to try to cash
another heart, then lead dummy's spade jack, hoping to pin west's singleton nine
or queen. That play looks dangerous, but further thought reveals that if
RHO is indeed 4-4-2-3, you cannot prevail.
So concluding, you play east for his actual pattern, in which case you don't
even need another heart trick! Opting for the most elegant line, you ruff
another diamond, then play the ♣K and ruff a club,
to this position:
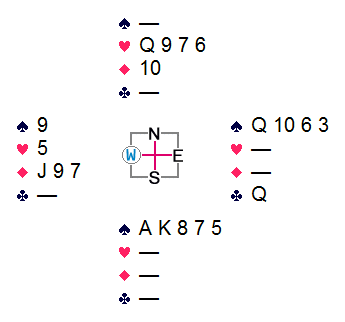
Dummy's diamond is ruffed low as east can do no better than to discard his last
club. Now the lead of the ♠A followed by the
♠8 endplays RHO in trumps. As your opponents failed
to bid this 'wonderful' game, you pick up 10 imp on the board.
Unfortunately, you are not destined to win this or any subsequent match in
this event. Oh, well — at least you have one good story to tell
when you get home.